before we begin i must just say a little bit about my blanket.
for me i like to do simple crocheting projects,
and this blanket could not be more simpler...
i often wish i was the sort to lay out all the yarn before hand,
and have some clue as to what one is aiming for.
but for me that is never the case,
just as when i sew i rarely know what fabrics will come into play when i begin,
so it is for my crocheting.
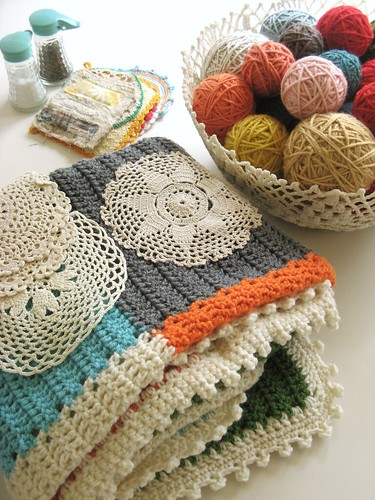
for sometime now i have been wishing to make a patchwork blanket,
in my head i saw the large squares, the doilies and the edging
but what i could not see was how i would attach the squares together...
i wished to join them as i went along,
saving me all the joining up at the end, which i'm crappity crap at,
it sends me into a big bad moody person.
i had little clue as to what i was doing when i started out,
but i do believe the handcrafted Gods were smiling down on me.
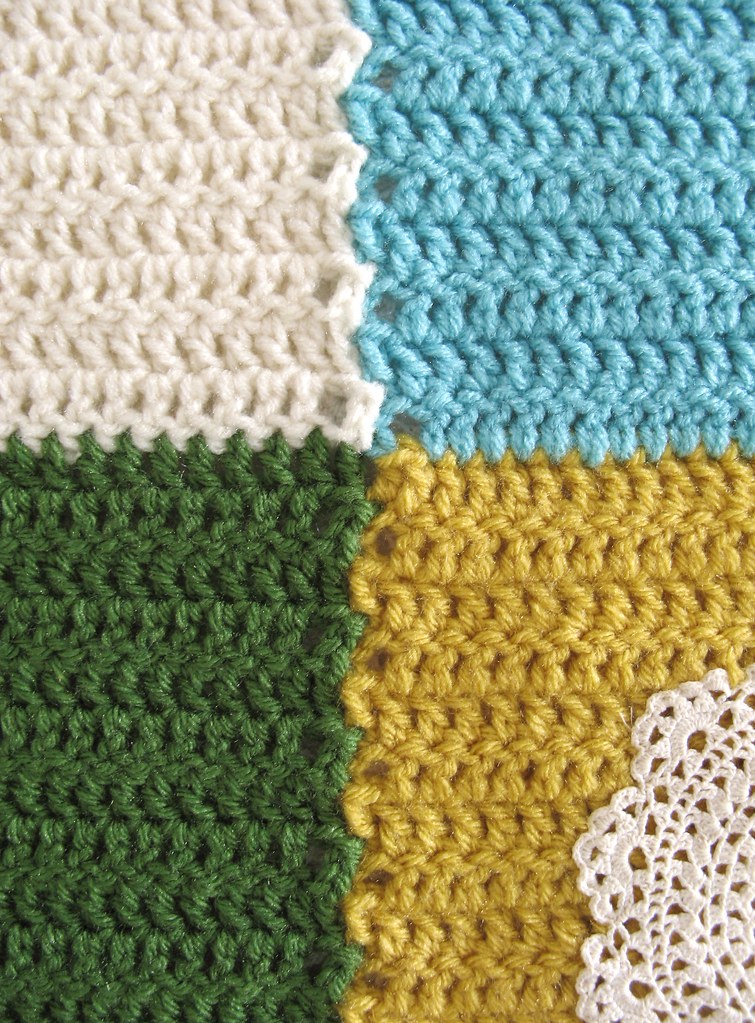
everything fell into place
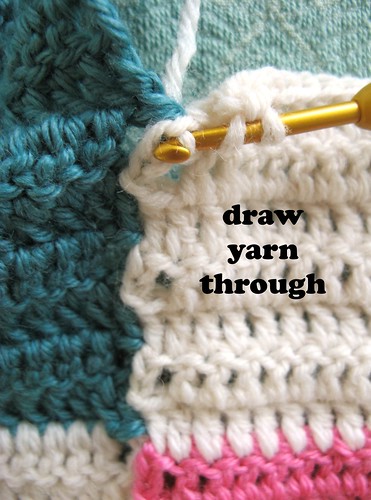
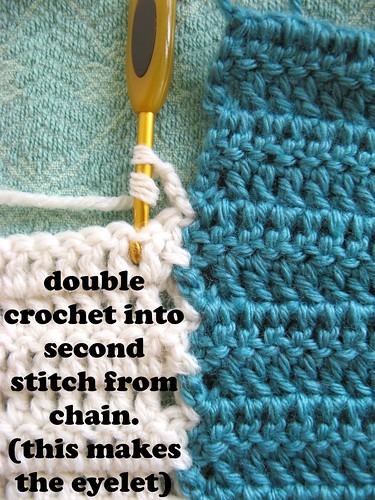
as i attached the squares a pretty eyelet pattern appeared
and i think it would be most true to say
i did indeed hug myself with glee.
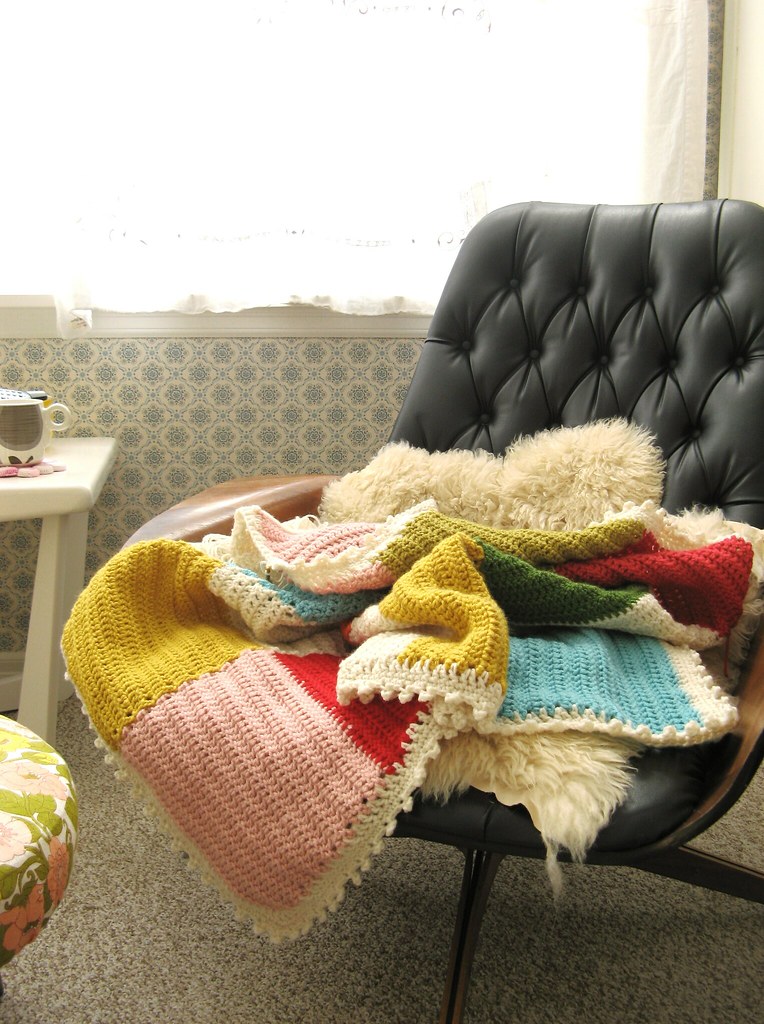
now my blanket is complete,

i have high hopes that she will become my travelling companion,
she will travel with me to old blighty this summer
and where ever else i may go in the future.
in short i am hopeful, we will grow old together
with all that being said, i will now tell you in words how i made her
but i do have pictures to show the joining up bit...
i can not promise you will be any the wiser after looking at the pictures
and reading my iffy directions,
but as usual, it is what it is and i have done the best i know how.
i used worsted weight yarn,
a mix of acrylic blends i had in my cupboard.
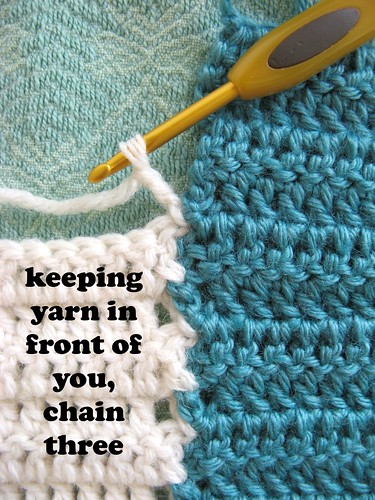
i started my square off with a chain of 30 plus 3
i worked in double crochet US which is treble crochet UK
when i finished my first square i joined in the next color
and continued crocheting, weaving in the ends as i went.
after 5 squares were completed (first strip completed)
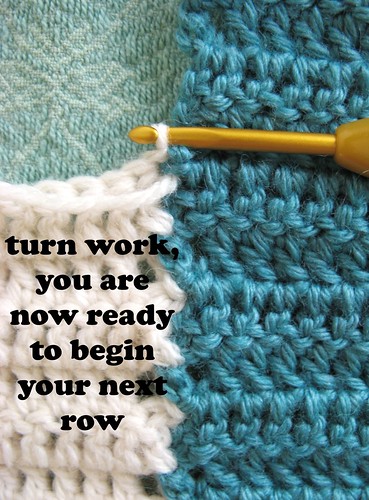
i started the next strip, joining the second strip to the first as i went
(see photos below)
i made 4 strips in total of 5 squares
making a blanket of 20 squares total
and measuring around 42" x 48"
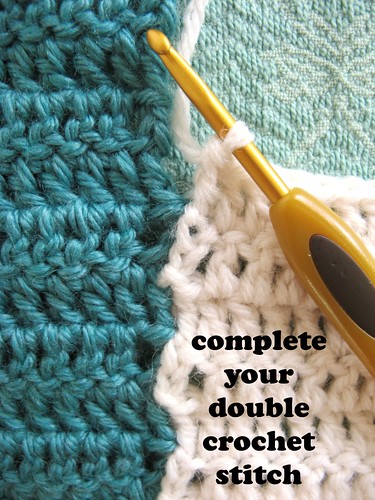
for the edging i did a double crochet US stitch in cream
then a row of single crochet US
finishing it off with a simple picot stitch giving it a lovely bobbly trim.
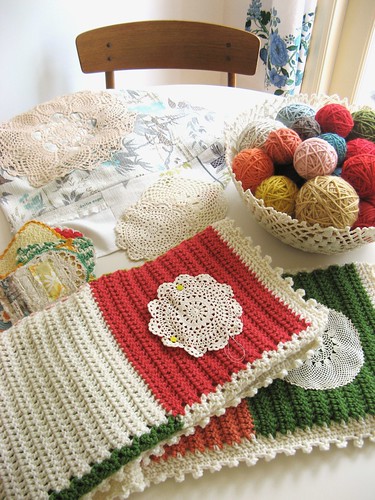
i appliqued on some vintage doilies,
just using simple hand stitching
and voila!
my 'ordinarily extraordinary' blanket was complete.
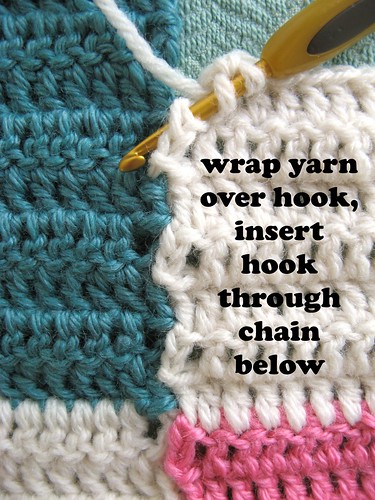
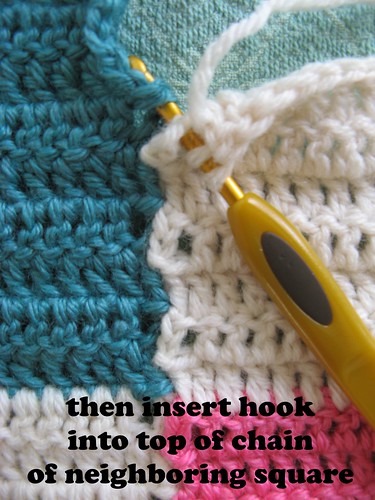
now for the NITTY GRITTY bit about joining the squares...


i do so hope this has done the trick,
that indeed you are now wiser to how i joined my squares
and not left in a bewildering confused state.
and perhaps you may spend the next month
whilst the World Cup is playing in your living rooms
making your own 'ordinarily extraordinary' blankets with the eyelet join
she is wishing you sunshine and crafting for the weekend ~ Tif
footynote: 'joining up' pictures show my lastest patchwork piece you can see in my hands here.
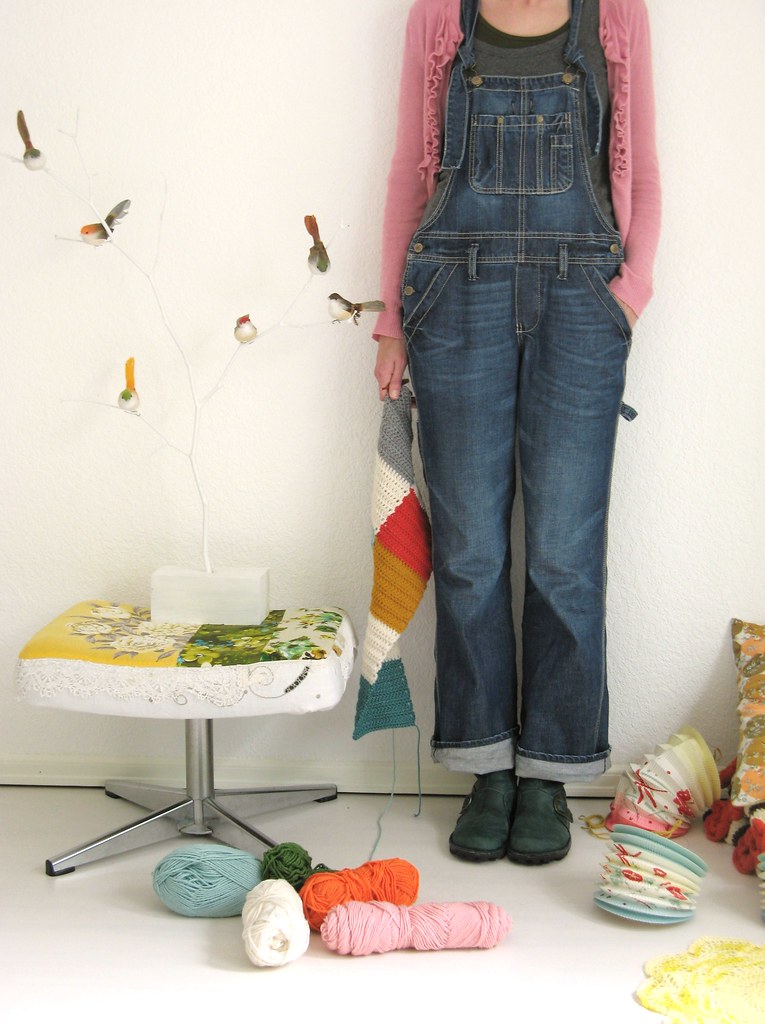
that is why the colors are little different :)
119 comments:
I love the way you joined the squares and I love the trim! I mostly crochet with wire now, but you're making me want to dig out some yarn :~)
Thanks for your delightful blog :~)
Oh my goodness! I love that blanket. It is so beautiful! Have a great weekend!
Peachy loveliness. Thank you thank you x
Love your blog!, I love your stuff you are doing!!!
Keep it going!
Loveliest Tif
I've been waiting all day for this wonderful 'how-to'.
I'm starting tomorrow morning after my 6.30am car boot foray (don't you wish you could join me though maybe not the 6.30am bit!)
thank you a thousand times for sharing this & giving me another crochet project to obsess about.
XXXX
Jane
double and tripple yay! i've been waiting {rather impatiently i might add} for this to be posted up! i have grand plans of knocking out the baby blanket i'm working on for a friend and then getting started on my own brand of this extraordinary/ordinary blanket!
it's beautiful, tif! the doilies on top make it all the more special. here's to many happy years together!
That is indeed an ingenious way to put the blanket together....the little eyelets add so much.
Marilyn
Oh thank you for that..I shall be trying this as soon as I have some yummy yarn..
beautiful beautiful blankie and i also love that font! x
I can't wait to give it a go!
what a great tutorial! now i think i could crochet something - for the first time, though certainly not like your extraordinary blanket - because of those very clear photos and directions. thank you very much!
hope you enjoy a wonderful weekend.
kathy
I love this blanket! I'm going to attempt one similar, thanks for the how-to!
So nice and easy to understand. Thank you so much!
i love your blanket! it is beautiful.
and i can not crochet to save my life.
i am currently knitting a patchwork blanket for my nephew who is due to come into the world in about 9 weeks. crocheting the squares looks so much more even and professional than knitting.
thx for the post, i will give it another go.
xxox
Most definately have some projects planned while bad football on. Your blanket looks a darn good distraction.
X
Thanks, Tif, now I'm going to have to finish my granny stripe cushion in double quick time and start a Dottie Angel blanket! Can't wait. I even have some yarn in my secret stash box so I can get going as soon as I come back from my trip to Finland. Hope you have a lovely time in Blighty - bring all your clothes as it's warm, sunny, chilly, rainy - you name it, we've got it! Is the World Cup on? I hadn't noticed :)
Most splendid indeed.... I often experience a little 'joining up' rage myself. I always seem to spend more time finishing off than doing the fun bits! Will definitely give it a go.
I'm also experiencing a little yarn envy! Good ole Blighty seems not to have such 50's-a-licious colours in acrylic yarn... I CANNOT find a pastel-ish pink no matter how much i search!! (I believe the term to be Granny knicker pink... ; )
I think your new blanket would make a most splendid traveling companion for WHEN (Note i didn't say IF...) you bring your crafting retreat to the UK!!... (Please!)
; )
simple things are usually the most beautiful ones. thank you for sharing your ideas. i'm already looking forward to trying out your ordinarily extraordinary blanket tutorial.
i'm also terrible at joining up squares at the end, i guess it must be a rather common condition :)
smiles from spain
Brava! I believe I understand, and will be beginning a new ordinarily extraordinary blanket of my very own. Thank you!
Your blanket is lovely and the 'How to' works for me. Good luck with the next one!
Have a good weekend.
The tutorial was great! Thank you so much. I have always wondered how to join squares, and this is such a pretty way to do it. I love the idea of joining as you go, and the results are beautiful. I can't wait to try it! You've inspired me to start something new. Thanks again for taking the time to share how you did it.
She's so lovely! I vow to learn how to crochet...someday! All the cutest patterns are crochet!
I love the lace edging and doilies on the otherwise plain looking blanket. You know how to rock it Dotty Angel!
as always, a pst filled with loveanf giving. I'll give it a try.
Thank you for this tutorial :) The photos are very clear. Those sewn on doilies make all the difference from a nice blanket to a simply delicious one!
Dear Tif...
For the crocheting gods were smiling very brightly...
In a perfectly extraordinary way indeed...
Your tutorial is just wonderful...
and indeed your method is I believe most helpful...
and creative...
I will love making one of these gorgeous blankets...
and thank you so much for sharing...
Crochet is so versatile that it allows the maker to improvise and I loved that you have done just that...and come up with something that will last and look so amazing for years to come...
Now to the yarn shop I must go...
and in a rather rushed and distressed state due to the lack of matching overall attire that would help me pick out the right colours and look I am after...
But I will have to hold my head high and hope upon purchasing the most pretty yarn I can find, I manage to wander into the next thrifty store and find that there they are waiting for me in all there vintage glory...
and are most happy I was there to save them...
Regards my dear...
hurrah! i'm so warmed to know you are all wiser and not bewildered as i feared... you have all been so kind to me and my 'ordinarily extraordinary' blanket :)
and michelle, i wish for the second hand gods to smile down on you, so you too may find yourself a perfectly peachy pair of overalls :)
have a lovely weekend my dearies!
thanks for the tutorial tif! the up-close photos are super helpful. definitely want to make one sometime.. it is delightful!
thank you for sharing Tif.
i have a little secret, shell i tell you?
i want to live at the mossy shed!
Your blanket looks fab, what size hook did you use for your blanket?
I found your blog in Artful Blogging and I have been reading it since in my Google Reader. Love your posts!
Oh, my!! This is awesome! Thank you, thank you, thank you for sharing this with us!
I love it!!! Do you think it would be ok to have yet another WIP??:)
Vivienne x
I love your blanket, and I think I will make one too! THanks for your how to!!
I love your blanket; it's definitely more than just ordinary. Great idea to sew the doilies on to break up some of the squares!
WOW...thank you...you're just BRILLIANT!!!!
Such a great tutorial.
I may start crocheting again...can I take a crochet needle on an airplane?
Char
Thank you so much Tif! It was as clear as a bell. I have a problem now. Do I make this blanket or Lucy's Granny Stripe next? What a delicious problem...hey I could start them both at the same time! Lots of love, Amanda xxx
hahah! silly me, yes it did occur to me late last night that i did not actually mention the size of Mr Hook. he is a H 5.0mm :)
and yes i'm quite sure you can hook on an airplane but best to check with the airline i'm thinking ahead of time... i have plans to do so this summer :)
Thank you so much for taking the time to post this! I love the look of the crochet join, and the fact that all that tedious sewing together of squares is not necessary. I dread the sewing up and will leave squares stashed away in a dark hole forever before I ever (or never) get around to putting them all together.
thank you for sharing your joining up crochet squares, it all makes sense now!!
Your posts make me smile so I have left you a beautiful blogger award over at my blog x
Love the final result. Thanks for you instructions. I can use them!
Happy weekend
Madelief
Fantastic!
Dear Tif,
Thank you, thank you, thank you...I have been sitting on the edge of my crochet hook all week waiting for the tutorial - can't wait to get started!
Vickie in "finally sunny" Seattle
I so love that! That you for showing us how you did it. It really is a well named blanket - you have definitely taken it well out of the realms of ordinariiness. Love how you joined the squares - very handy to know that! xxx
Thankyou so much! I have wanted to make a patch blanket forever, but couldnt bear the thought of sewing them together - lovely!
what a delightfull balnket and thank you for this tutorial so clear.
SUPER SUPER LINDO!!!!!!besos!!!you are a super inspiration for me!!!!
Oh a FABULOUS post! I love your beautiful blanket - its simply elegant!
so original! I love the doilies attached to the squares, what a brilliant idea!
You did an amazing job!
Thank you Miss Tif for this wonderful tut on joining... great photos... even I can understand it all... ha ha
Thank you so much Tif! The photos are "ever so easy to understand!" and make me very happy ...
BTW I love those overalls on you.
This just might be the crochet project that I will be inspired to complete! So lovely
Oh I L.O.V.E. your blog and your blanket! It's so gorgeous!
I have a blog post on my blog and you can add a link to something you've made yourself in it. I would absolutely love it if you would leave a link. It can be a link to your blog or Flickr-album for instance. Perhaps it sounds
a bit complicated, it really isn't.
Bye!
Annemarie
Thank you Tif for this lovely idea. I rushed off to my local wool shop and my version is now underway. I don't have a blog (I creep around and read everyone elses!) but I do have a flickr account and have added many of your pics as faves. Thank you muchly for posting the pics and directions for joining squares. Such a fab idea, even my wool shop owner loves it. Cheers Donna
BE.U.TIFUL!!!
& thank you thank you thank you for the how to. i can't wait to give it a go.
happy world cup watching :)
gigi
on doing one square cast on 30 and when that row is finished do you chain one or three before you turn and do the next row on that square?
LOOOOOVE the blanket!
angelina, when i turn to start the next row i chain up 3, giving it a nice straight edge :)
so delighted my joining up pictures have been clear for all, this has made me most happy indeedy!
I love the look of this blanket. My mom showed me one stitch as a young child and from there on I kind of played on my own, never learning how to read a pattern or what things were actually called. I know what's going on in your tutorial and that speaks volumes to me seeing as I normally cannot follow much of anything having to do with crochet. Thanks for the inspiration :)
lovely blanket but I'm actually being distracted by the lace bedspread underneath it - could you tell us about that one day? It's stunning!
Wow. The blanket is amazing, Tif. Lovely, lovely!
~S.
I just saw this posted on Twitter. So pretty! I hope you don't mind, I passed it along to some friends who make blankets for the Victory Junction Gang Camp. A very worthy effort!
No seaming means more blankets, I think! Great tutorial!
Your blanket looks brilliant, so pretty. Thanks for the joining tutorial, I've not seen that method before, and think i may use it in a blanket of my own which I'm close to finishing :-)
Well I can't even work out how to join the second square to the first one so I am doomed already! lol
i like ur work. it seem like we have somtings in common.
Aww... That is definitely the cutest 'cheesy' blanket!
Love it!
thanks so much for this tutorial! the blanket is beautiful and the instructions are very clear. Can't wait to get started on my own blankie!
xoxo
Sonya
This is brilliant! Thank you so much for the tutorial.
Lovely!
Thanks for great explanation with your pictures.
BR from Sweden
Oh WOW Dottie! This is so, so gorgeous! I'm completely smitten. I'll be linking to this project if you don't mind. I'm off to add it to my own gotta-make-it list. I think this has to be my next blanket! Thank you so much for the gorgeous how-to!
Oops- I meant to write... "I would love to link to this if you DIDN'T mind." Is there a place I can write for permission? I am dying to share this with my readers. =)
rachel, no worries :)
you are welcome to post a link to it! thank you kindly for asking
and thank you all kindly for your lovely comments on my blanket.
i am delighted that my little 'how to' with the joining has inspired so many of you to make your own 'ordinarily extraordinary' blankets :)
This is lovely, I have been looking for a pretty blanket for my god-daughter's birthday in September, and this fits the bill perfectly!
wonderful to read your lovely comments again and to think about all the peachy blankets in progress around the globe :)
thank you for your kind words my lovelies
Tif x
hi my name is Pauline and I have been a crocher for 40+ yrs, I do like your rug ,But I have been doing that joining for about 30 yrs ,when I first learnt to crochet, I would experiment with stitches ,and wondered if I could join the squares with out sewing them tog some of the doilies are done with this technick so I came up with this joining method,for the squares just thought you would like to know ,I live in Australia
Hello Dottie, inspired by your blanket, I started making one myself. I just finished my first stripe. Now I am trying to work out the joint as you go tutorial. Maybe a silly question, but how do you make the first join?
Thanks for you inspiration and tutorial.
Claudia
thanks alot for the great how to! I've just made my own blanket from the how to, and I am so proud ;)
You can see it here if you want to:
http://nr59.dk/blog/?p=2091
Thanks again dottie angel :)
I like the simple stuff too, that doesn't involve a lot of counting and losing your place. This is a gorgeous blanket. I love the doilies - what a great idea!
I've had your how-to book marked for a while now and I just stumbled up on it in my favorites. Thank you so much for taking the time to post individual pictures with your instructions. I know this is a task in itself! I have plans to use your pattern for a soft cotton baby blanket. Your work is pure loveliness. :)
hurrah! delighted that the blankets are all coming along nicely...
lovely to hear from you pauline and i am not surprised you have been using this join up for years ever since you worked it out! i was so excited when i figured out how to join up the squares, but i was quite sure many had already done so before me, i think just like you, i will be using this join up for years to come :)
and tedclau, when you get to the end of your first strip, change your yarn color and then chain out from that very spot, when your chain is the correct length, turn your work and crochet back toward your first strip and begin the join up. i do hope that helps you figure it out. it is a little iffy but i think once you get started you will see what i mean :)
It is lovely, and old fashioned. My grandmother would have loved this. Thanks to your instructions, I'm going to try making one of my own.
I've got one going right now; off and on. Now I'm inspired to complete it.
Thank you!
Ficou muito bem.
Parabéns pela ideia.
WOW!! That's one of the prettiest blankets I've seen so far! Thanks for sharing. I'd love to create one of these.
Wonderful! Wonderful!
It is gorgeous!
I have just added a link to the tutorial to our crafting portal. hope you do not mind!
If you do, do let me know.
Love, love, love this afghan! I definitely want to do one for myself! Thanks for sharing your tip on joining as you go! Definitely beats the putting together at the end.
Amy
www.crazyforthecountry.com
delighted my dears! glad you are happily making your own 'ordinarily extraordinary' blankets :)
What a wonderful technique! Thank you for sharing.
For a dressier look, I can see beautiful satin ribbon woven through the eyelets.
I love this blanket so much and I would love to snuggle up in it, but I can't figure out how to get the first square of the next row started(I already have my first row of 6 squares). I've tried several times and several different ways.
Please Dottie, I can't bare to give up on her just yet. I beg you, how do I connect the first square? Do I chain into the square, chain 30+3 and make my way back, or do I chain 30+3 and join when I come back? Thank you for sharing your instructions and for your help.
hello rachel!
when you get to the end of your first row, join your color for the first square of your next row. chain 30 (+3). basically you will have your row of 6 squares and a little tail coming from it.
then double crochet back along the chain towards your first completed row and start the joining up.
if this still doesn't make sense then email me tif@dottieangel.com and i will do my best to get you on the right path so you may enjoy your blanket and not give up!
Tif x
Thanks for sharing :) tank's to you I have a new friend around the house. Let me introduce Mr. Blanket :) http://www.flickr.com/photos/dark_/5450150367/
and I have to say you make a very beautiful things :)
she looks perfectly peachy! thank you for showing me :)
Hi Tif,
I love your site - it's so informative! I also love the step by step photos.
I just thought you might be interested in this pattern collection from AllFreeCrochetAfghanPatterns: http://www.allfreecrochetafghanpatterns.com/Baby-Blanket-Afghans/15-Fast-Crochet-Afghan-Patterns ... who doesn't love a quick pattern?
Have a great day!
you've made me a happier human being!
Thank you!
What a brill blanket. I am book marking your site as I am just learning to crochet. Your tips a ace.
Pam UK
Dear Tif, after years of admiring your work, I finally started learning crochet. You are one of the persons who inspired me to do so. I posted my first crochet, a rug, in my blog http://catarinaregina.blogspot.com/2011/04/meu-primeiro-croche.html
but now my next crochet project is this beautiful blanket.
I hope I can make it, and thank you so much for the how to.
Regina, your rug is beautiful and i am in awe of your crafty crocheting talents :)
i am quite sure your next blanket project will be equally as peachy!
I love it and have got my wool and hook out for an afternoons crocheting in the hopes of ending up with something like this! Thanks for the inspiration. I am in awe of your talent.
A year after you posted this delicious throw, I am finally ready to begin.
Mine will be in the colors of the sea and shore.
Thank you for sharing this brilliant (but easy) idea.
KS in FL
I just randomly saw this post on Pinterest. I really love the idea of attaching doilies to the blanket! It looks so vintage-y; the perfect touch!
www.curtnlinds.blogspot.com
delighted to think more blankets are being made and enjoyed... you are so kind to share your comments with me and i so appreciate them :)
I am so excited to be working on this blanket. . .but I have a question. . .on the first strip, I made each block 18 rows of DC, but when I did the first square on the second row, there had to be 19 rows of DC in order to "come back" to do the join. . .is that how yours went or are all the blocks the same amount of rows? thanks so much, Molly
Hi, in regards to my comment about the rows. . .I figured it out, and I feel like saying, "duh!" : )
Can't wait to show off my finished dottie angel blanket!
thanks, Molly
molly b! so delighted you figured it out :) be sure to show me when you finish it!
Tif x
I'm so glad I found your site. I love the afghan and wish I had doilies to use like you did but I'll have to do something else. The really neat thing is that I HATE to join squares and you have spelled out a wonderful way to make strips and then join the strips. When I 1st saw the blanket I thought, "oh squares to join." Thanks for the new idea on crocheting blocks together. I can probably use it even for blocks that are of a different pattern!
Leandra
I'm definitely making this (once i finish my current afghan). I live in the NW and i get cold easily so i can never have too many blankets. this pattern is adorable and it will help me get better at crocheting. Thank you so much for posting this :]
At my daughter's for the weekend and have plenty of crochet time...so I started one of these blankets. Not sure if I'm doing it exactly "right", but whatever I am doing seems to be working. LOL :)
Just picked out the colors for my first "Ordinarily Extraordinary" Dollie afghan. I'm so excited for the yarn to arrive so I can get started. I'm in awe of this blanket! I'm a beginner and I truly believe that this is the best tutorial I've found so far. The pictures + text is a wonderful idea for visual learners, such as myself. :o)
Quick question though, do you know where I could get some vintage doilies? I'm not that good at crocheting yet to make my own.
hello Brie!
so happy to hear you are going to be making your own blanket! as for doilies, well if you are lucky, the thrift store can come up trumps, but the other thing is to take a look on etsy and ebay, sometimes you can find 'a lot' which has a few in it and not too badly priced.
i wish you luck my dear with your blanket and any problems, just let me know and i'd be happy to help :)
Love this project. I'm taking a shot at it too. Very excited. Thanks so much for sharing your wonderful ideas! Love your blog :)
I came across this blanket on pinterest and knew I had to make it! The first row was made without a problem however after I switched colors to continue the first square of my second row I ran into a snag...
I chained 30 + 3, turned, and double crocheted back. Here is where the problems started... As stated in the tutorial, to join, I am to yarn over and insert hook through the chain below. Where exactly is that? I'm confused because the very first chain to make the 2nd row doesn't have a chain before it, correct?
Tarrah, this pattern is several years old and it has been that long since i made one. without making one again, i am unable to understand what you are asking. i have had no one else ask me about this, i have other questions but never this one. however i know folks have posted this on the Ravelry site, i do not have an account but if you look under 'dottie angel' you will find this blanket along with others who have left tips. perhaps you will find the answer there. hope that helps you :)
and just to clarify, the page on Ravelry was not made by dottie angel, but it all links back to me here. i know this, because a friend who has an account showed me :)
Hi Tif! Thank you for taking the time to respond to my previous inquiry! To clarify my question, I think TedClau's comment from August 2nd, 2010 was more what I was getting at.
She writes "Hello Dottie, inspired by your blanket, I started making one myself. I just finished my first stripe. Now I am trying to work out the joint as you go tutorial. Maybe a silly question, but how do you make the first join?
Thanks for you inspiration and tutorial.
Claudia"
Your reply to her comment on August 23rd 2010: "and tedclau, when you get to the end of your first strip, change your yarn color and then chain out from that very spot, when your chain is the correct length, turn your work and crochet back toward your first strip and begin the join up. i do hope that helps you figure it out. it is a little iffy but i think once you get started you will see what i mean :)"
Like Claudia, I've made the first strip and am trying to figure out how to start the join to make the second strip. To do this I thought I was suppose change the yarn color, chain 30+3 (would this be considered the 'foundation chain' for the second strip?), turn and then dc back towards the first strip. The problem I am facing is translating your joining instructions in the second picture of your tutorial. I'll take another peek at your pictures and give it another go. I absolutely love this blanket and am looking forward to see the end result!
Oh, and I did scour Ravelry and didnt find an answer to my question. :)
made this in a baby blanket size and it got RAVE reviews.
the blankets I make are sent to
3rd world countries. Fello crocheters asked for the pattern, gladly gave it. Its now a
popular pattern. many thaks.
hello Tarrah,
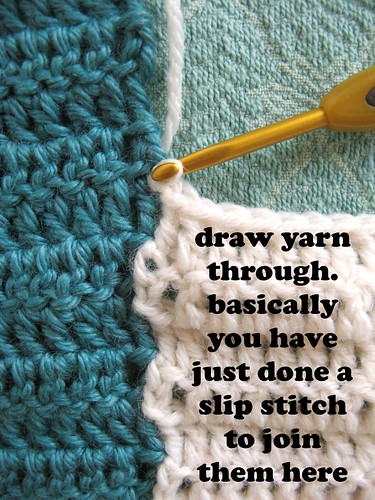
so yes i've gone over things and see what i wrote to Claudia makes sense to me. what you have said is correct too. you are crocheting back towards your strip and when you get to the point as in photo 1. you then wrap over your hook, (photo 2) insert it in the top of the turning chain of the row below and complete the stitch. it might be that you just have to give it go and see what happens. i know for me even now when i use this method i kind of don't quite know why it works but it just does and you get a feeling for where to place the hook for the join.
sorry if i'm not helping you but that is the best i can do without actually showing you in person. i do hope you get past this bit and enjoy making your blanket
:)
wonderful annon! is it possible for you to share with me your site and the links, i would love to see more, thank you!
Oh, my god!! your balnket is so pretty!!! I think i fall in love!!
I would like to try it, do you have any doilie patterns? or do you know where can I find good ones?
Thanks in advance.
http://glindalabrujabuenadelnorte.blogspot.com.es/
I can't believe it. I just completed making the strips from a pattern I foung. Now I'm ready to join and was wondering how how to join. I came across your post. All the strips are completed but not joined together. I don't see any reason why I can't still join them the way you have? I also like the edging. I have subscribed to your feed. Thanks so much. Pat
Post a Comment